728x90
반응형
이전 글에서 2개의 얼굴 사진을 이용해서 face swap을 했다.
[GUI 기반 Face Toy Project -3] 들로네 삼각 변환(Delaunay triangulation)
이전 글에 실시간 face mesh 출력을 해보았다. GUI 기반 Face Toy Project -2 지난 시간에 PyQt5를 이용해서 간단한 baseline을 만들고 스마트폰 카메라를 웹캠처럼 사용해보았다. GUI 기반 Face Toy Project - 1 더
yeeca.tistory.com
이번에는 실시간 적용을 해보도록 한다.
우선 저번 메인문을 함수로 옮기고 frame과 source를 구분하여 변수명을 바꿔준다.
def swapFace(frame,source_path='./dev/images.jpg'):
source_img = cv2.imread(source_path)
points_frame = getPoints(frame)
points_source,source_img = getPoints(source_img,cv2.COLOR_BGR2RGB,True)
frame_draw = frame.copy()
if np.shape(points_frame) != (468,2):
return frame
hullInedx = cv2.convexHull(np.array(points_frame),returnPoints=False)
hull1 = [points_source[int(idx)] for idx in hullInedx]
hull2 = [points_frame[int(idx)] for idx in hullInedx]
triangles = getTriangles(frame,hull2)
for i in range(0,len(triangles)):
t1 = [hull1[triangles[i][j]] for j in range(3)]
t2 = [hull2[triangles[i][j]] for j in range(3)]
warpTriangle(source_img,frame_draw,t1,t2)
mask = np.zeros(frame.shape[:2],dtype=frame.dtype)
cv2.fillConvexPoly(mask,np.int32(hull2),(255,255,255))
r = cv2.boundingRect(np.float32(hull2))
center = ((r[0]+int(r[2]/2), r[1]+int(r[3]/2)))
output = cv2.seamlessClone(np.uint8(frame_draw),frame,mask,center,cv2.NORMAL_CLONE)
return output
작성했던 함수들은 그대로 복붙 한다.
미리 만든 button 2를 누르면 동작하게 했다.
그리고 이전 코드가 동작에 문제가 있어 많이 수정했다.
바뀐 update_frame은 다음과 같다.
def update_frame(self):
ret, frame = self.video.read()
if ret:
frame = cv2.cvtColor(frame, cv2.COLOR_BGR2RGB)
frame = processing(frame,self.handler)
frame, self.pTime = plot_fps(frame,self.pTime)
image = QImage(frame, frame.shape[1], frame.shape[0], QImage.Format_RGB888)
pixmap = QPixmap.fromImage(image)
self.label.setPixmap(pixmap)
실행 결과는 아래와 같다.
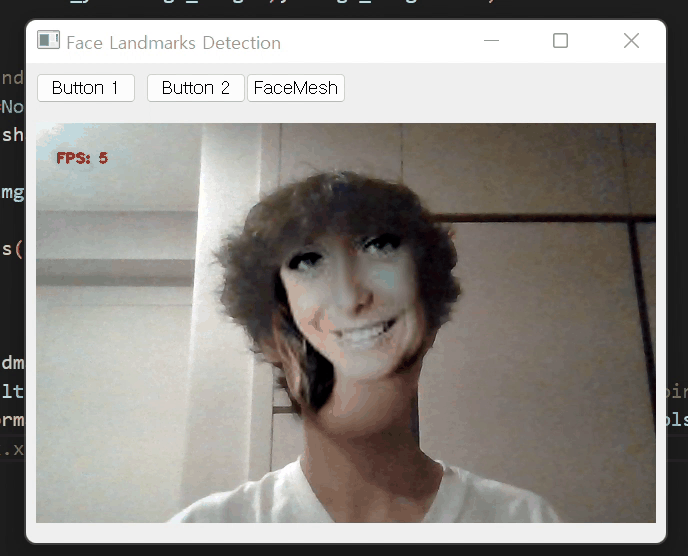
이 코드를 응용하면 같은 화면에서 내 옆 사람과 얼굴을 실시간으로 바꿀 수도 있을 것이다.
다음 글에서는 face morphing을 적용해 볼 것이다.
728x90
반응형
'Projects > Face Toy Project' 카테고리의 다른 글
| [GUI 기반 Face Toy Project -6] real time face alignment opencv (0) | 2023.04.11 |
|---|---|
| [GUI 기반 Face Toy Project -5] face alignment opencv (0) | 2023.04.10 |
| [GUI 기반 Face Toy Project -3] 들로네 삼각 변환(Delaunay triangulation) (0) | 2023.04.07 |
| GUI 기반 Face Toy Project -2 (0) | 2023.04.05 |
| GUI 기반 Face Toy Project - 1 (0) | 2023.04.02 |


댓글